Staining a patio is a project anyone can handle. However, achieving a beautiful result that lasts over time requires a bit more than simply applying a product.
Several details make all the difference: preparation, product selection, weather conditions, and application technique. Over the years, we’ve seen many successful projects… and some less so. Here, we share the essential points to master to put all the odds in your favor.
01
Cleaning the Deck
A successful staining project always begins with a thorough cleaning.
The goal is to eliminate contaminants, residues, and microorganisms present on the wood surface. Even if you plan to sand, it is important to start by cleaning.
Why? Because by sanding a dirty surface, you risk spreading contaminants across the entire surface… and even embedding them into the wood.
In the case of a patio that has grayed, it is even more critical. Sanding can remove some visible stains, but certain fungi remain embedded in the wood fibers. As a result, graying quickly reappears, often as dark spots that detract from the uniformity of the finish.
Which cleaner should you use for your patio?
The choice of product depends directly on the condition of your wood.
If your patio has completely grayed, the ideal is to use a wood brightener.
This type of product helps restore your wood’s original color and give it a more uniform appearance before stain application. Wood Wash is an excellent choice for a wood brightener.

“Excellent product for brightening patio wood. Exceeded my expectations. The wood was completely black and regained its natural color. ”
André (client confirmé)
To ensure the patio is clean and to eliminate slight graying.
If your patio is in relatively good condition, a patio maintenance cleaner is sufficient. It helps remove grease, dust, salt, and contaminants accumulated during winter.
Furthermore, cleaning in the spring is a simple habit that greatly helps prolong the life of your stain.

“I had tried several products to clean my Sansin Dec-treated deck, which had become dull with dirt and mud, without success. I thought it was ruined! The multiwash diluted 1 part to 5 parts water restored its original appearance! 😀
Cliente Satisfaite (cliente confirmée)
This is THE product I needed!”
Can I use a pressure washer to clean my patio?
Yes, you can absolutely use your pressure washer to clean your patio! It’s even faster and requires less effort! However, you must still take several precautions to avoid damaging your wood.

You must always maintain a distance of 12 to 18 inches between the nozzle and the wood. If you do not respect this distance, you risk damaging your wood.
The same applies to pressure: we recommend not exceeding approximately 500 psi to avoid deteriorating your patio boards.
02
Patio Sanding: The Key to a Stain That Doesn't Peel
When it comes to staining, sanding is probably the most important step.
It allows you to open the pores of the wood and ensure good penetration of the stain. Without this porosity, the stain remains on the surface, which increases the risk of peeling.
We cannot repeat it often enough: good sanding is often what makes the difference between a stain that peels and a stain that wears gradually over the years. Whether your patio boards are old or new, it is important that you sand them. We explain why.

Why sand aged wood?
Over time, not all boards age in the same way. Some areas become more porous, while others remain more closed.
This variation creates a problem during application: the stain penetrates more in some areas and less in others. As a result, you end up with an uneven finish, darker in some places and lighter in others.
Sanding helps to even out the surface and remove dead wood cells. These cells, in addition to being unsightly, hinder stain adhesion.
If your patio has already been stained and the finish is starting to peel, sanding becomes even more important. It helps prevent adhesion problems and reactions between different products.

Why you should sand your patio even when it’s new
Even new wood must be sanded.
During manufacturing, boards are planed to obtain a uniform surface. This process creates what is called a mill glaze, which closes the pores of the wood.
This glaze prevents the stain from penetrating correctly. By lightly sanding, you remove this layer and restore the wood’s absorption capacity.
This is a simple but essential step to ensure the durability of the finish.
03
Choosing the right sander for your patio
Large floor sanders may seem practical, but they are not suitable for patios.
They have difficulty reaching the joints between boards, and their movement is not ideal for following the wood grain.
An orbital or rotary sander with a 5 to 6-inch disc remains the best choice. It allows for more precise and uniform work, even if it takes a little more time.
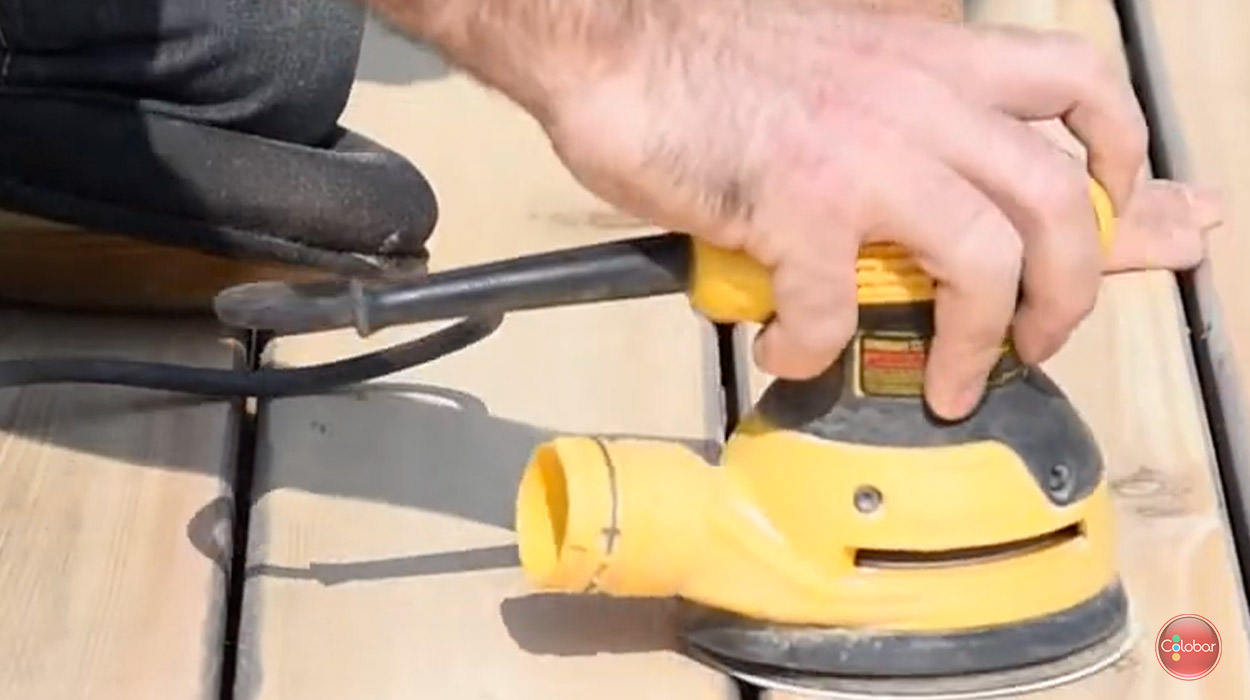
By sanding board by board, you ensure that your sanding is impeccable. This way, your stain will remain uniform longer!
04
How to achieve successful sanding
-
Always sand with the grain of the wood
This may seem like a trivial detail, but it makes a huge difference to the final result. By sanding with the grain, you avoid creating cross-grain marks that may show through once the stain is applied. In addition to having a more beautiful finish, you also facilitate the penetration of the stain into the wood.
-
Choose the right sandpaper
The choice of sandpaper directly influences the quality of your sanding… and the level of effort you need to put into it. Good quality paper will work more efficiently, last longer, and prevent you from having to force the machine.
At Colobar, we often recommend 80-grit to sufficiently open the pores of the wood and promote good stain penetration. That said, the correct grit can vary depending on the wood species and the product used. When in doubt, always take the time to check the manufacturer’s recommendations.
-
Change sandpaper often
It’s tempting to extend the life of your sandpaper… but ultimately, it often makes you lose time (and energy). Worn paper becomes much less effective and forces you to press harder on the sander.
As a result, you risk creating undesirable marks in the wood and getting a less uniform sanding. Ideally, change your paper approximately every 25 sq ft, or even more often if you are working on very resinous wood.

“Very good product, only problem: during my first order I received papers without holes and I expected to receive the same thing this time, which suited me because the hole-less ones were very good, but I received them with holes... they are still very effective.”
Pierre Dery (client confirmé)
-
Stain within days of sanding
Once your patio is sanded, the wood is at its maximum porosity. This is exactly the state you want it to be in when you apply your stain.
Over time, the wood pores will naturally close, especially depending on weather conditions. If you wait too long, you may have to sand again to regain a good adhesion surface. In short, as soon as the weather permits, apply the stain without too much delay.
-
Dry dust the patio
After sanding, it is essential to remove all dust before applying your stain. But be careful how you do it.
We recommend dry dusting, with a broom or a vacuum cleaner. If you rinse with water, you will re-wet the wood… and have to wait at least 24 hours before you can continue.
Worse still: some of the dust-laden water can penetrate the wood and clog the pores you just opened. This means the stain penetrates less effectively, and your finish is compromised from the start.

04
Pro tips for staining your patio
Once the preparation is complete, application becomes much simpler. This is often the most enjoyable step of the project.
We still have some tips to share for a smooth application and a flawless result.
Choose the right brush
Use a brush specifically designed for staining. These brushes are normally designed primarily with natural bristles.

- 2 to 3 business days delivery
-
- Same-day in-store pickup
-
Opt for a brush with a detachable handle

”''Excellent achat, pas mal plus facile de travailler debout qu’à quatre pattes.
Le pinceau est d’excellente qualité''
Denis Marcil (client confirmé)
-
Apply the stain one or two boards at a time.
-
Apply with the grain

-
Is it possible to apply stain with a sprayer?
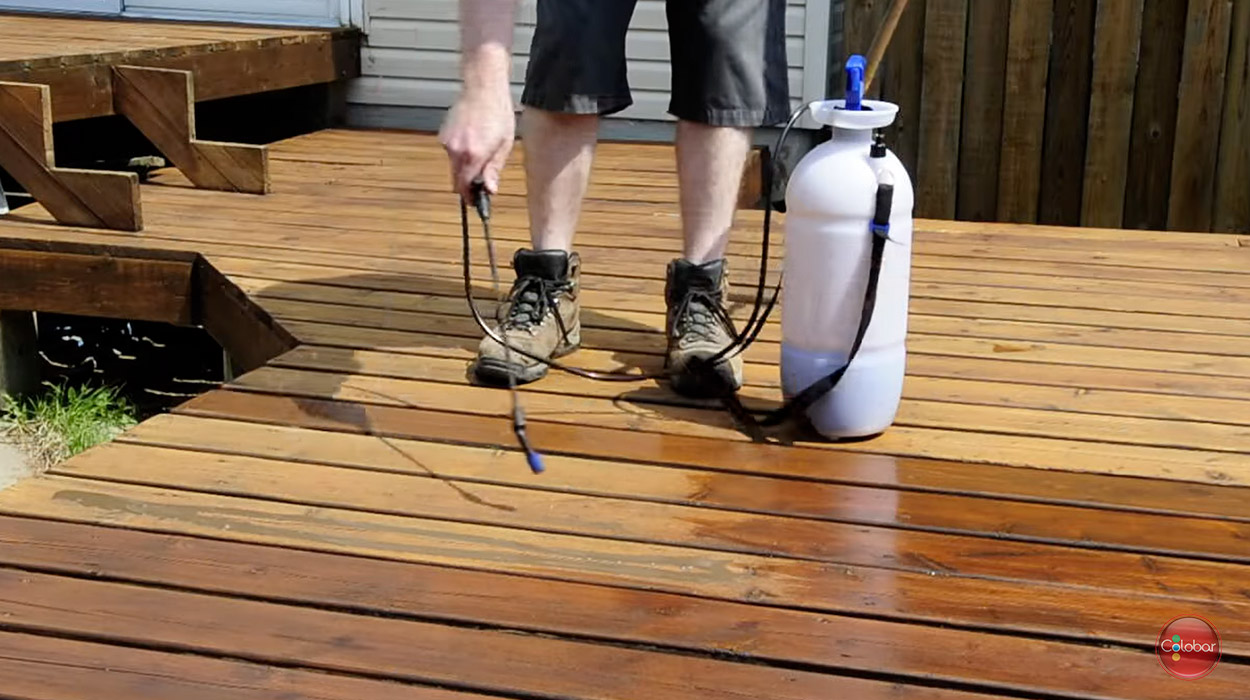
-
Refreshing your stain: better to prevent than to sand
When it comes to maintaining your patio, the reflex to adopt is simple: don’t wait until it’s too late.
If you let your stain wear completely down to bare wood, you will have no choice but to start from scratch… meaning complete sanding. And that is by far the longest and most demanding step of the project.
Conversely, if you remain attentive and apply a maintenance coat as soon as the finish begins to dull or weaken, you can avoid all that work. You prolong the life of your stain without having to start all over again.
Another important point: applying a maintenance coat to an already too worn patio rarely yields a good result. Areas where the wood is bare will not react the same way as those where there is still stain. This results in an uneven finish, with visible color variations.
By maintaining a preventive approach, you ensure a more uniform, more durable patio… and you save yourself a lot of effort in the long run.

Products found in this article.

Sansin DEC – teinture pour patios en bois

Huile de protection pour bois extérieur Alis de Livos
Nettoyant pour terrasse Multi wash

This video shows you in detail how to apply Sansin DEC stain to a cedar patio.
We invite you to watch this video capsule to learn all the tips and tricks for a successful patio staining project.
05
Weather: factors you cannot overlook
When you embark on a patio staining project, the weather plays a much more important role than you might think. In many cases, the problems we see — peeling, premature wear, uneven finish — are directly related to the weather conditions at the time of application.
If you want to avoid these problems, it is absolutely necessary to apply your stain in good conditions. This will allow the product to penetrate the wood properly and perform as it should over time.
One point not to be overlooked: not all stains react in the same way. Some products tolerate a little more humidity, others much less. That’s why, no matter your project, you must always refer to the manufacturer’s recommendations.
By respecting the right conditions from the start, you put all the chances on your side.

-
The wood must be completely dry before staining
Before you even think about applying your stain, make sure of one thing: your wood must be dry. Not just on the surface… truly dry deep down.
Why is this so important? Because if the wood pores are filled with water, the stain will not be able to penetrate correctly. It will remain on the surface, adhere superficially… and eventually peel much faster.
Imagine your boards like a sponge. If it’s already full of water, no matter how much you dip it in stain, it won’t absorb anything. It’s exactly the same principle with your patio.
In addition to hindering penetration, humidity can also dilute the stain during application, which will affect the performance of your finish.
In most cases, it is recommended to wait at least 24 hours after rain before staining. After heavy rain, or depending on the product used, this can extend to 48 to 72 hours.
-
In spring: allow time for the wood to dry
With the snowmelt, your patio is often saturated with water in early spring. Even if the surface may seem dry, moisture remains present in the wood.
That’s why early spring is generally not the right time to stain. It’s better to let the warmth and sun do their work, and wait until the wood has dried thoroughly before applying anything.
However, this period is ideal for preparing your patio: cleaning, inspection, minor repairs… Everything that will allow you to be ready as soon as conditions are right for staining.

Generally, we recommend waiting until mid-May or early June before sanding and staining your patio. Obviously, this can vary from year to year, but the idea remains the same: allow the wood time to dry completely after winter. Rushing too early is often when problems begin.
-
Respect the correct temperature range
For your stain to perform as expected, the air and surface temperatures should ideally be between 10°C and 25°C. And this is not just during application. As long as the stain is not completely dry (up to 24 hours later), it remains sensitive to ambient conditions.
A common mistake is to only look at the daytime temperature. If the temperature drops too much in the evening, it can hinder drying. In some cases, the moisture contained in the stain can even react to the cold and compromise the finish.
-
Avoid extreme temperatures
If you apply your stain when it’s too cold, it will not penetrate the wood well. This results in a more fragile finish, which risks peeling or wearing quickly.Conversely, in very hot weather, the stain dries too quickly on the surface. It doesn’t have time to penetrate correctly, and you also increase the risk of overlap marks.
In both cases, the problem is the same: a stain that doesn’t adhere properly… and reduced durability.
-
Avoid applying stain in direct sunlight
Applying in direct sunlight is not a good idea. Direct heat “cooks” the stain on the surface of the wood, which hinders its penetration and accelerates its drying time. This will result in more lap marks, as well as a less durable finish.
-
Monitor rain and humidity
Before you start, make sure you have at least 24 hours without rain ahead of you. A shower on fresh stain can dilute it, create marks, and weaken its resistance.
If dew falls immediately after application, it will negatively affect the result. Make sure there are at least a few hours between application and evening dew.
-
When is the best time to apply stain?
The best time to stain your patio is after the morning dew has evaporated, but before the intense heat of the afternoon.
In practice, this is generally between 10 AM and 1:30 PM depending on the season and the positioning of your patio. This way, you avoid humidity, excessive heat, and overly intense sun.
-
Take the time to plan carefully
Before starting, always check the recommendations of your stain manufacturer. Each product has its specificities, particularly regarding drying time and humidity tolerance. By planning your project well and respecting the right conditions, you maximize your chances of obtaining a beautiful and long-lasting result.
Commence ton projet maintenant !
Tu trouveras tous les produits sur notre site web pour teindre ton patio comme un.e pro.
- Commence par mesurer les dimensions de ton patio pour savoir les quantités dont tu as besoin. À titre d’exemple, pour un patio de 300 pi2 tu auras besoin de :
- 1 gallon de Multi-wash ou 2 gallons de Wood Wash
- 2 gallons de Sansin Dec
- ou 5 L d’Huile pour terrasse Alis
- Entre 12 et 30 feuilles de papier sablé abrasif
- Choisis la finition qui convient le mieux à tes goûts et à ton patio:
- Passe ta commande et choisis entre le ramassage en magasin le jour même ou la livraison à domicile en 2 ou 3 jours ouvrables.
Tu veux en apprendre plus sur la teinture extérieure et le traitement du bois ? On en parle dans notre blogue !
Q&A
Q – Why does my stain remain sticky?
This occurs mainly with penetrating oils. If the application conditions are not ideal (surface too humid, sun beating directly on the patio during application), the oil penetrates the wood poorly and remains on the surface, forming a sticky film.
Respect the application conditions recommended by the manufacturer to prevent this from happening.
Q – I have darker areas than others after application. What happened?
This is generally caused by uneven wood absorption or inconsistent application. Some areas are more porous and absorb more stain, making them darker. To limit this phenomenon, it is necessary to work with uniform saturation and maintain a wet edge during application. If variations are already visible, a very light, uniformly applied coat can sometimes reduce contrasts.
Q – What to do if dust or debris falls on fresh stain?
This is a common problem, especially outdoors. The reflex to intervene immediately can worsen the situation, as the surface is still wet. Wait until the stain is completely dry, then clean dry. Avoid using a cleaner during the first few days after application.
Q – Why does my stain wear out faster in certain areas?
Areas with more traffic or exposure to more wear (under gutters, etc.) will wear down to bare wood more quickly.
You can maintain these areas more regularly. If the rest of your patio still looks good, there’s no need to sand everything: only sand the most worn boards, then apply a first coat to the boards you sanded. Then, apply a second coat to the entire patio for a uniform look.
Q – Why doesn't my stain produce the expected color?
The final color depends heavily on the type of wood, its age, and its condition. Two different surfaces can react very differently to the same stain. To avoid surprises, it is always recommended to test on a small, inconspicuous area before staining the entire patio.
Q – How long should I wait before putting furniture back on the patio?
Even if the surface seems dry after a few hours, the stain continues to harden deep down. Putting furniture back too soon can mark the finish or hinder its curing. It is therefore preferable to wait at least 24 to 48 hours, and avoid rugs for a few days to allow for proper curing.