Delivery: Ready to ship anywhere in Canada
“Excellent product, easy to apply and gives a superb result! A very nice way to give a second life and make it a feature element at low cost. In addition, the service offered by the Colobar team was beyond expectations!”
We often hear the same thought in-store: “My countertop is still in good condition, but I can’t stand looking at it anymore.” After a few years, colors go out of style, surfaces wear out, and the kitchen starts to look dated, even if the countertop remains perfectly functional.
The good news? You don’t necessarily need to replace your countertop to give it a brand new look.
In many cases, it’s possible to cover the existing surface with a cementitious coating and completely transform its appearance without undertaking major demolition work.
In addition to being much less invasive than a complete replacement, this solution generally allows the project to be completed in just two days and saves a significant portion of the budget normally allocated to installing a new countertop.
01
Prepare the countertop
For laminate, concrete, wood, and other smooth surfaces.
Before applying Microconcrete, you must properly prepare the surface. Preparation varies depending on your countertop material.
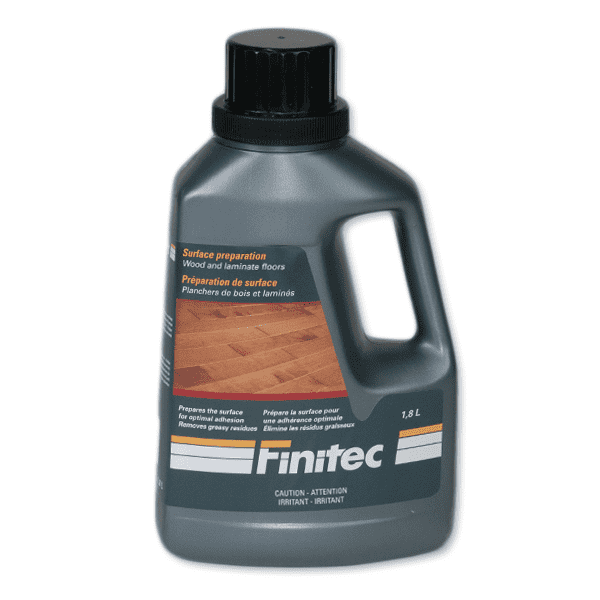
However, regardless of your countertop type, you will need to start with a thorough cleaning using Finitec Surface Preparation.
- Start by mixing the Finitec Surface Preparation by shaking it for a few seconds. Then, using a Finitec Applicator, spread the cleaner over the surface. Where there are stubborn stains, scrub more vigorously.
- Let the product sit for a few minutes. Then, wipe the countertop with a lint-free cloth.
- Allow to dry completely before moving on to the next step.
For a ceramic countertop
Preparation takes 3 additional steps if your countertop is ceramic, as you must fill the grout lines before applying the Microconcrete to the entire countertop.
- If your countertop is ceramic, you must be careful to thoroughly scrub and clean the grout lines (see steps 1 to 3 above), as grime and dirt tend to accumulate there.
- Seal the grout lines by applying a coat of Protective Sealer (the same one you will use later for finishing). Use a small brush to easily access the recesses of the grout lines, then let the sealer dry completely.
- Apply a coat of Filling Microconcrete or Microconcrete (if you have a surface less than 50 sq ft) into the grout lines to fill them and level the surface. Use a small trowel to deposit the cementitious coating into the grout lines, then level the countertop surface. This step may require 2 coats. Then let the Filling Microconcrete dry.
TIP: Keep a damp cloth handy to wipe your tools and any spills as you go. This way, you’ll work more cleanly.
02
Mix the cementitious coating
Mix the Microconcrete
Before starting the application, take the time to thoroughly mix the Microconcrete. A homogeneous mixture facilitates application and helps achieve a uniform finish.
To prepare the product, you will simply need the Microconcrete cementitious powder and water.
- Maintain a ratio of 20 ml of water per 100 g of powder.
- This corresponds to approximately 700 ml of water for a 3.5 kg kit or 3 L of water for an 18 kg kit.
- First, pour the water into a clean bucket.
- Then gradually add the cementitious powder to limit dust formation.
- Mix with a drill equipped with a paint mixer until a homogeneous texture is obtained.
- While mixing, regularly scrape the sides and bottom of the container with a stick to incorporate all the product and avoid lumps.
Once the mixture is uniform, you can proceed to apply the Microconcrete to the countertop.

03
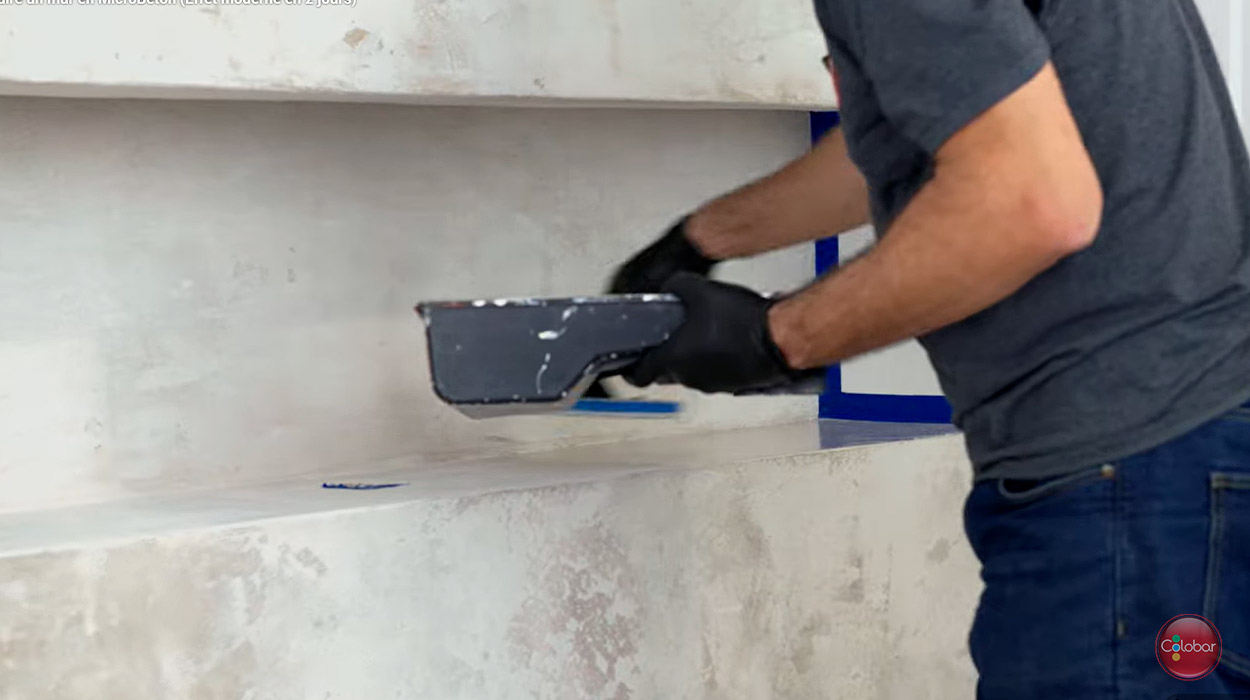
Apply Microconcrete for a concrete effect countertop
You will need a trowel and a stainless steel finishing spatula to apply the concrete coating. With two coats, you will get a countertop that looks brand new!
- Apply a thin coat of Microconcrete using the trowel in half-moon movements. Continue until the entire countertop surface is covered.
- Let the coat dry for about 4 hours. Keep in mind that the Microconcrete will change color as it dries.
- Do you want a completely smooth finish? Sand the first coat to soften it, using an orbital sander with 80-grit sandpaper. If you want a more rustic look but don’t want unevenness on the surface, use a trowel and scrape the countertop flat.
- Apply a second coat in the same way as the first.
When you are finished, let the cementitious coating dry for 12 hours before applying the finish.
TIP: Clean your tools immediately after finishing each coat. Once dry, Microconcrete is much more difficult to clean.
04
Apply the finish to the countertop
The last step in your kitchen countertop resurfacing project is to protect the concrete coating with Finitec Protective Sealer. If you want to prevent your kitchen countertop from staining and accumulating dust, we recommend using the “wet look” sealer. This finish will also give it maximum durability.
- Start by scraping the countertop with a trowel to remove any rough spots.
- Mix the sealer container for a few seconds. Then let it rest for 5 to 10 minutes to allow air bubbles to escape.
- Spread the sealer using the Finitec applicator. The applicator allows you to go over the same spot without fear of drips or marks. Make straight, uniform movements. Then let the first coat dry for two hours.
- Apply a second coat in the same manner. A maximum of two coats can be applied for the matte finish sealer. This is why we do not really recommend it for countertop protection. In our opinion, the protection of a matte finish is not sufficient for a surface as heavily used as a kitchen countertop.
- For the wet look sealer, apply three to four coats, allowing a drying time of 2 hours between each coat.
IMPORTANT: Do not wait more than 12 hours between sealer coats, otherwise you will need to lightly sand to allow for adhesion of the next coat.
Start your project now!
You will find all the products you need directly on our website.
- Start by measuring your countertop dimensions to calculate the quantities you need.
- Choose the Microconcrete color you like.
- Place your order online and choose between in-store pickup and home delivery.
Want to learn more about the possibilities with the concrete effect? Check out the “concrete effect” section of our blog!
Products found in this article.

MicroBéton Cementitious Coating
Finitec Surface Preparation

Finitec Protective Sealer
FAQ
Q. Can all countertops be covered with Microconcrete?
No. Microconcrete needs a stable substrate. If your countertop moves when you lean on it, if some sections are swollen due to humidity, or if the laminate is peeling, these problems must be corrected before considering covering the countertop. Microconcrete is very resistant, but it cannot prevent an unstable substrate from continuing to deteriorate.
Q. My countertop is near a sink that has already leaked. Is this a problem?
Possibly. Many countertops appear solid on the surface, while the underlying panel has started to swell due to water. Before starting, especially check the areas around the sink, dishwasher, and countertop joints. If the substrate is already damaged by moisture, it is best to fix the problem before investing time and money in the project.
Q. Can I place a hot pan directly on a Microconcrete countertop?**
No. Even if Microconcrete itself tolerates heat well, it is generally the protective sealer that represents the system’s limit. As with most modern countertops, it is recommended to use a trivet to avoid the risk of marks, discoloration, or premature deterioration of the finish.
Q. What happens if I decide to change styles in a few years?
Contrary to popular belief, Microconcrete is not a permanent solution. If you wish to change the appearance of the countertop later, it is generally possible to sand the finish and re-cover the surface. This is often much simpler and more economical than completely replacing a countertop.
Q. Is a very dark countertop or one with a busy pattern likely to show through the Microconcrete?
Normally, no, if the product is applied according to recommendations. However, certain repairs, poorly leveled joints, or significant differences in relief can sometimes remain perceptible in the final finish. Microconcrete masks colors, but it does not make physical defects of the substrate disappear.
Q. What is the most expensive mistake when undertaking this type of project?
Wanting to go too fast. Many people follow the application steps but shorten drying times because the product feels dry to the touch. However, applying a subsequent coat to a substrate that has not dried sufficiently can compromise the adhesion and durability of the entire system. A few hours saved initially can sometimes cost several days of rework later.