A concrete floor can sometimes hold unpleasant surprises, and moisture is often the cause.
You want to install an epoxy floor or lay wood over your concrete, but you suspect a moisture problem? Before going any further, you need to fix the issue at the source.
The good news is that there are several solutions designed to stop moisture rising through your concrete slab.
From anti-moisture sealers to vapour-barrier epoxy, we present the different options to solve your damp concrete slab problem, whether it’s in the basement or in your garage!
01
How to recognize moisture problems on your concrete slab
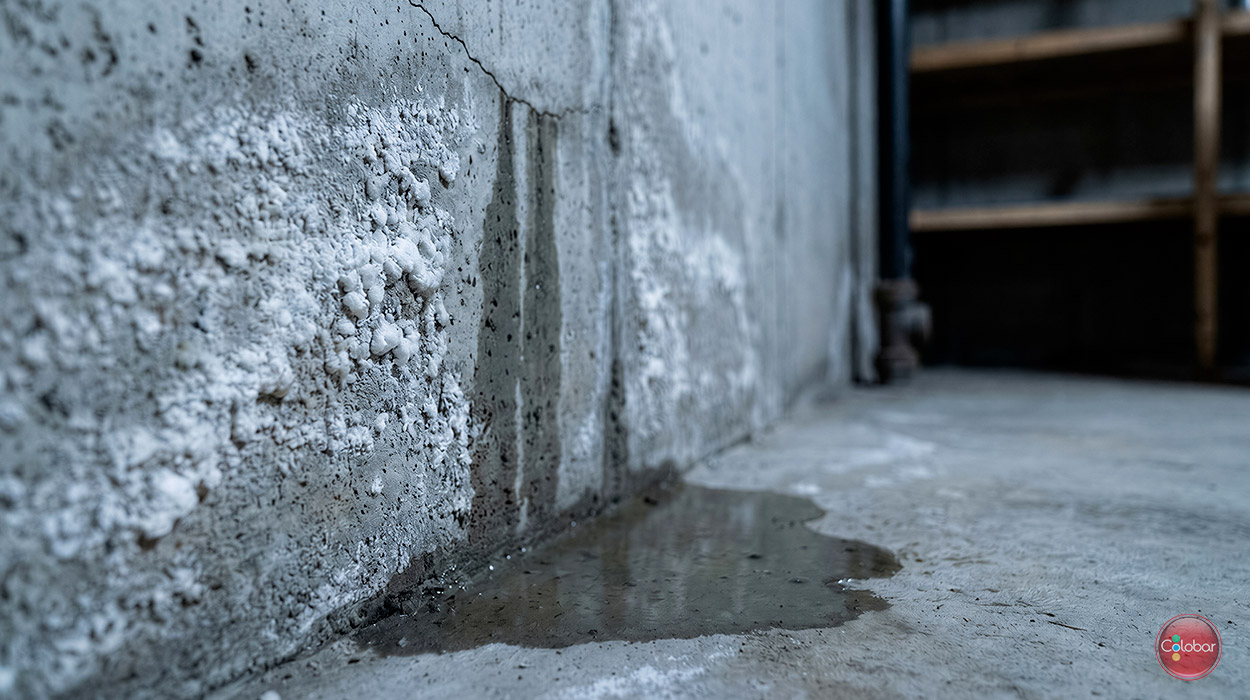
Before choosing the right solution, you first need to determine whether your concrete floor actually has a moisture problem.
A first easy-to-spot sign is the presence of a white, powdery substance on the surface of the concrete. This is probably efflorescence, a phenomenon often associated with moisture in concrete.
There are several ways to check the moisture level:
- You can use a hygrometer to measure the relative humidity in the concrete. However, this device does not make it possible to determine whether the moisture is coming from the concrete itself.
- To check directly for the presence of moisture in the concrete, you can do the polyethylene test. Tape a square of polyethylene about 12 in x 12 in to the floor, making sure to seal all four sides well.
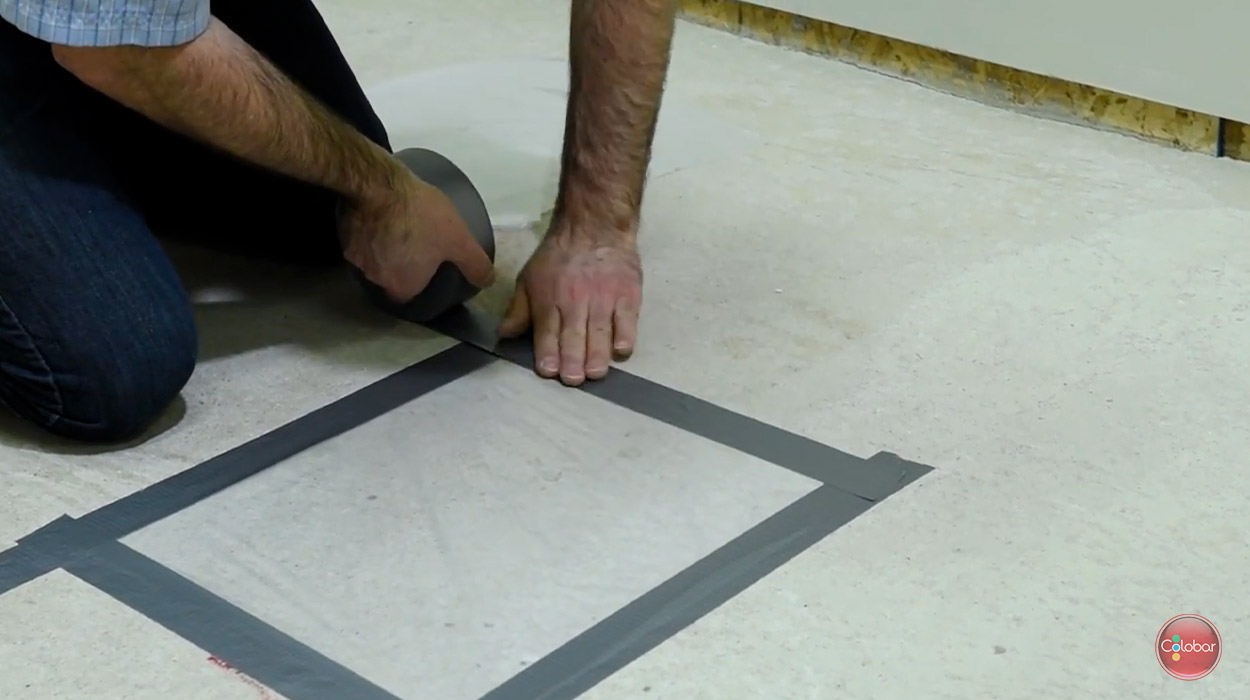
Then wait 12 to 24 hours. If condensation appears under the polyethylene or if the concrete becomes visibly darker, this may indicate moisture migrating through the slab.
In that case, it’s best to address the moisture problem before installing your finish flooring.
02
Apply an anti-moisture sealer
Si ton béton fait face à un problème d’humidité majeur, tu vas devoir absolumment appliquer un scellant anti humidité avant quoique ce soit d’autre.
Les conséquences, sinon ? Le produit de finition que tu va appliquer par dessus ta dalle de béton va emprisonner l’humidité. En cherchant à sortir, l’humidité va faire peler ou écailler la finition.
Le scellant anti humidité Rock Solid est la première couche à appliquer sur une dalle de béton très humide (mais pas mouillé). Il va créer une barrière contre l’humidité qui va permettre à la finition de bien adhérer.
Rock Solid se faufile aussi dans les microfissures et se lie chimiquement avec le béton. Ça permet donc de renforcer un béton fragile et réduire le problème d’effritement et de poussière en surface.
A) Nettoyer la dalle de béton
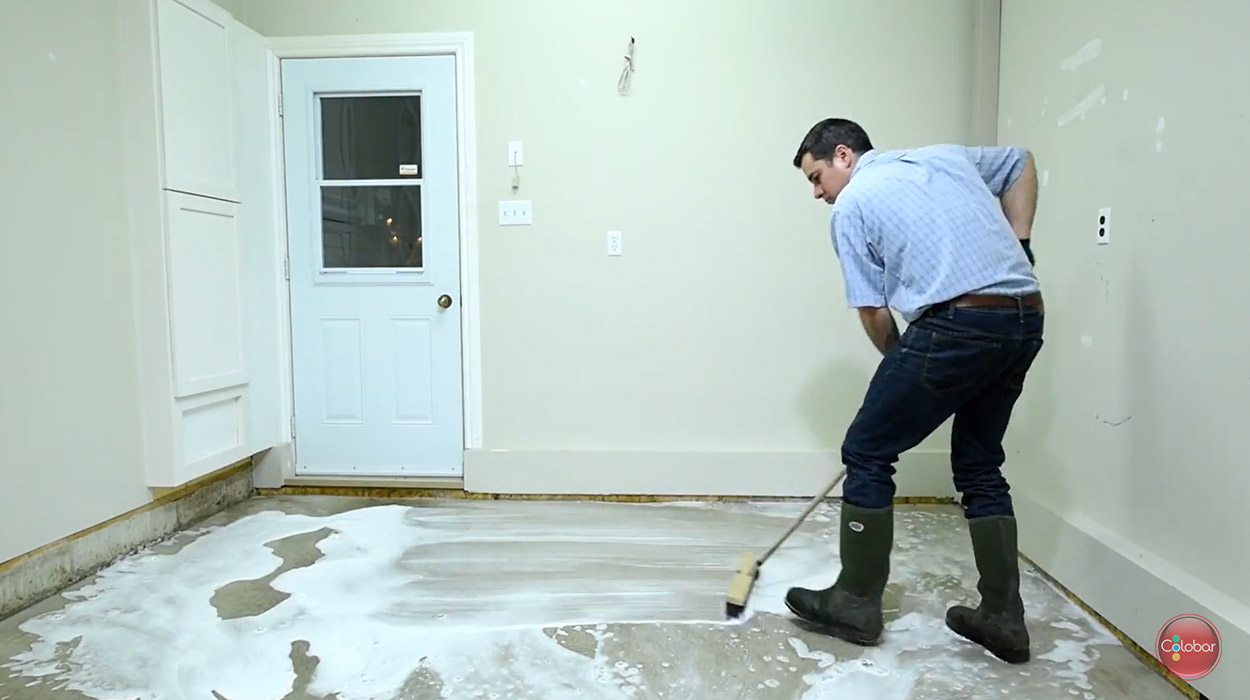
First, it’s important that your concrete slab is properly prepared. Start by cleaning thoroughly with a concrete prep cleaner such as Krud Kutter.
- Dilute the cleaner using a mixing ratio of 6 parts water to 1 part Krud Kutter.
- Apply the solution to your concrete slab with a sprayer, a roller or a brush.
- Scrub with a floor brush to loosen dirt, then let the cleaner work for 3 to 5 min.
- Then rinse the floor to remove any product residue. If you’re working on a basement slab and there’s no drain, mop carefully instead to avoid water buildup.
When you’re done cleaning, let the concrete dry for at least 24 hours. Then you can move on to grinding the floor.
B) Grind the surface

Grinding is important to remove as much friable concrete as possible from the surface. If your concrete is crumbling, it will cause the finish above to lift.
It’s beneficial even for concrete that’s too smooth: grinding makes it more porous, which helps the product adhere properly.
- Be sure to isolate the room with plastic sheeting to prevent dust from spreading throughout the house.
- Preferably use a diamond-head grinder. Otherwise, use a sander with 40- or 60-grit sandpaper.
- Make sure you grind the entire concrete slab thoroughly.
- Then remove sanding dust using a shop vacuum (shop-vac). Go over it twice rather than once to make sure nothing is left.
You can then apply the sealer to your floor.
C) Apply the sealer
Applying the Rocksolid sealer is fairly easy. Make sure to apply it in a well-ventilated room. Even though the product is water-based, its odour can be unpleasant.
- Start by mixing the sealer for 30 to 45 seconds.
- Apply the sealer with a sprayer or by pouring it directly onto the floor. It’s important to fully saturate the concrete slab, with coverage of about 175 sq ft/gallon.
- Then spread the sealer using a stiff-bristle brush or a squeege.
- Once your concrete slab is completely covered, wet the surface with a garden hose. You must make sure it stays wet for 35 to 45 min after applying the sealer.
- After 45 min, remove excess water and moisture from the floor surface with a squeege.
- Let it dry for 2 hours, then rinse again with a hose. Then remove any water the concrete does not absorb with the squeege.
IMPORTANT: If you don’t rinse the floor after applying the sealer, it could lead to efflorescence.
If your goal is only to reduce the moisture level in your basement or garage, you can use Rocksolid on its own. If you want to enhance the concrete slab or make it more resistant to abrasion and impacts, you can cover the sealer with epoxy, a vapour-barrier epoxy or a floor paint.
03
Stop moisture rising through a concrete slab with a vapour-barrier epoxy
Si ton plancher de béton présente un problème d’humidité, l’époxy pare-vapeur PE700228 de Passeport Élite pourrait être la solution.
Cet époxy 100 % solides a été conçu pour être appliqué sur des bétons humides (par contre pas mouillé). Il agit comme une sous-couche et permet de limiter les réactions pouvant se produire entre l’humidité du béton et l’époxy de finition.
L’époxy pare-vapeur peut tolérer un taux d’émission de vapeur d’eau allant jusqu’à 25 lb par 1 000 pi² sur une période de 24 heures.
Prends note que la teneur en humidité du substrat doit être inférieure à 4 % lors de l’application du revêtement. Au-delà de cette limite, la pression exercée par l’humidité peut entraîner le décollement du revêtement. Il faut toutefois savoir qu’il n’existe pas de méthode simple permettant de mesurer précisément la pression hydrostatique responsable du décollement d’une finition.
Dans plusieurs situations, l’utilisation d’un époxy pare-vapeur représente une solution beaucoup moins coûteuse et moins exigeante en travaux que de refaire une dalle de béton ou d’installer une membrane d’étanchéité.
Refaire un plancher de béton implique notamment d’attendre plusieurs mois avant de pouvoir recouvrir le béton neuf. De son côté, l’installation d’une membrane d’étanchéité nécessite généralement d’importants travaux d’excavation.
L’époxy pare-vapeur peut donc être une option intéressante lorsque tu veux traiter un problème d’humidité sans entreprendre des travaux majeurs.
Où peut-on appliquer l’époxy pare-vapeur?
Le PE700228 est un époxy résistant qui peut être utilisé dans des environnements résidentiels, commerciaux et industriels. Sa résistance aux acides lui permet notamment d’être appliqué sur des bétons présentant un pH élevé.
On peut le retrouver dans des environnements exigeants comme les aéroports, les hangars d’avion, les hôpitaux et les centres communautaires.
Mais pas besoin d’avoir un bâtiment industriel pour profiter de ses propriétés. Tu peux aussi l’utiliser à la maison pour traiter un plancher de sous-sol ou un vieux plancher de garage qui présente un problème d’humidité.
Une fois l’époxy pare-vapeur appliqué, elle peut être recouverte par un époxy 100 % solides ou par le polyuréthane de ton choix, selon le résultat recherché.
Comment appliquer l’époxy pare-vapeur?
Pour que le PE700228 joue pleinement son rôle de pare-vapeur, il faut appliquer une ou deux couches, pour une épaisseur totale de 15 à 16 mils de film sec.
Si tu veux éviter les bulles d’air, c’est plus prudent d’appliquer deux couches de 8 mils plutôt qu’une couche de 16 mils.
La préparation du béton demeure essentielle avant l’application. La surface doit être suffisamment propre et exempte de contaminants pouvant nuire à l’adhérence du produit. Les étapes à suivre sont les mêmes que celles mentionnées plus haut dans l’article.
A) Faire le mélange de l’époxy
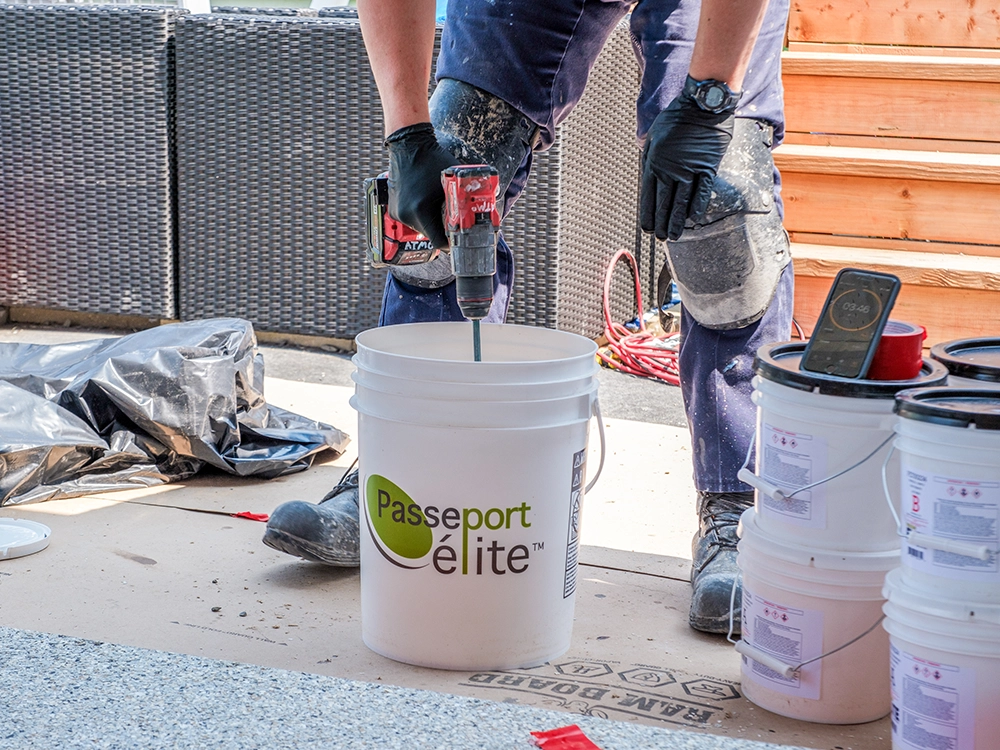
- Start by stirring each container individually with a stick. Make sure to scrape the bottom to ensure there are no deposits.
- Pour the activator (component B) into the resin (component A), following a 2A:1B mixing ratio.
- Mix using a paint mixer attached to an electric drill. Mix at low speed (300 to 450 rpm) for about 3 min. Halfway through, scrape the sides of the pail with a wooden stick.
Proceed with application as soon as mixing is complete
B) Spread the vapour-barrier epoxy
Once the vapour-barrier epoxy has been applied and fully cured, you can apply a coat of 100% solids epoxy or polyaspartic over it.
The goal is to create a complete system: the vapour barrier blocks moisture coming from the concrete, while the topcoat provides the look and performance you want for your floor.
Once the moisture problem has been treated, you can choose the finish that best matches your needs and the look you want to give your floor.
Start your project now!
You will find all the products you need directly on our website.
- Start by measuring the dimensions of your damp concrete slab to calculate the quantities you need.
- Determine whether you need to apply the Rocksolid sealer, the vapour-barrier epoxy, or both!
- If your concrete has a moisture level above 4%, you must apply the Rocksolid sealer.
- If your concrete has a moisture level of 4% or less, you can apply the vapour-barrier epoxy.
- Place your order online and choose between in-store pickup and home delivery.
Want to learn more about different epoxy projects? Check out the section of our blog dedicated to this topic!
Products found in this article.

RockSolid Stop Moisture Sealer for concrete

Industrial Moisture Vapor Barrier 100% solid Epoxy

100% solids epoxy for floor (4.5L)
FAQ
Q. Can a vapour-barrier epoxy replace a drainage repair?
No. If the moisture is coming from water infiltration, poor drainage, or a foundation waterproofing issue, you must address the cause first. The vapour barrier is designed to manage moisture migrating through the concrete, not to replace work on the structure or drainage.
Q. What should I do if my floor shows efflorescence after applying a vapour-barrier sealer?
Efflorescence appearing after the work may indicate that moisture is still migrating through the concrete. You should not simply apply a new coat over it. Instead, check whether the coating has maintained adhesion and determine whether the moisture level exceeds the system’s capacity.
Q. Can I apply a vapour barrier over concrete that is crumbling or friable?
Not without correcting the problem. Even a high-performance epoxy cannot compensate for a substrate that lacks cohesion. If the concrete surface is breaking down, the coating may bond to the surface particles rather than to solid concrete. Proper grinding and substrate preparation then become the priority.
Q. Is the polyethylene test enough to choose the right vapour-barrier system?
Not always. The polyethylene test is useful for detecting the presence of moisture, but it does not precisely measure the water vapour emission rate. If your project is significant or the floor shows marked moisture issues, it may be worthwhile to run more precise tests before choosing the finishing system.
Q. Is a vapour barrier necessary on all concrete basement floors?
No. Having a basement or a slab at grade does not automatically mean a vapour barrier is required. The decision should be based on the actual condition of the concrete and the finishing system you plan to install. In some cases, a breathable or non-film-forming sealer may be more appropriate.
Q. What happens if the moisture in my concrete exceeds the vapour barrier’s capacity?
This is one of the main points not to overlook. If the moisture level or the pressure exerted by water vapour exceeds the system’s limits, the coating may eventually lose adhesion and delaminate. In such a situation, it’s better to address the source of the problem rather than relying only on a coating to hold back an excessive amount of moisture.